Quick Facts
- Productivity ROI: Forrester research indicates a 186% ROI over five years for enterprise Mac deployments.
- User Sentiment: A global survey shows 97% of respondents reported that using a Mac increased their overall productivity.
- Ease of Use: Approximately 89% of Mac users believe that macOS applications are easier to use thanks to integrated multi-touch navigation.
- Efficiency Hack: Mastering gestures reduces the 2-second hand-off delay between keyboard and mouse, saving roughly 3% of a workday.
- Top Feature: Force Click Data Detectors allow for instant calendar event creation and flight tracking.
- Hidden Gem: Three-finger drag is the ultimate ergonomic setting for long-term wrist health.
- System Version: Modern optimizations for macOS Sequoia allow for advanced window tiling via trackpad.
MacBook trackpad gestures such as the three-finger upward swipe for Mission Control and the four-finger side swipe for switching full-screen apps significantly enhance multitasking. Force Click allows users to preview files or look up definitions instantly, while App Exposé provides a quick overview of all windows within a specific application. These built-in tools reduce reliance on complex keyboard shortcuts and streamline navigation across macOS.
As a PC editor who spends a significant portion of my day benchmarking hardware and fine-tuning workflows, I have realized that the most expensive CPU in the world cannot fix a slow interface. We often obsess over clock speeds and thermal throttling, but we overlook the literal point of contact: the trackpad. In the macOS ecosystem, the trackpad is not just a pointing device; it is a multi-layered command center.
Recent data suggests that the hardware itself is a productivity multiplier. In fact, 97% of respondents reported that using a Mac increased their overall productivity in enterprise environments. This is not just because of the silicon; it is because of the way macOS allows you to glide through tasks. If you are still moving your cursor to the top menu bar for every action, you are leaving time on the table. Let’s dive into how you can reclaim that time by finding the best macbook trackpad settings for productivity.
1. Mastering Force Click and the Taptic Engine
The most misunderstood part of a modern MacBook is the click itself. Since 2015, MacBook trackpads have not physically moved. When you press down, you are not depressing a hinge; instead, the Taptic Engine provides Haptic feedback that mimics the feel of a click. This lack of moving parts allows for Pressure sensitivity, which Apple leverages through a feature called Force Click.
Force Click utilizes the MacBook's Taptic Engine to detect deeper pressure beyond a standard click. By pressing firmly on a file icon, link, or word, users can trigger Quick Look previews, dictionary definitions, or access data detectors like calendar event creation. This pressure-sensitive interaction provides a layer of contextual shortcuts that speed up common tasks across macOS and various third-party applications without requiring additional menu navigation.
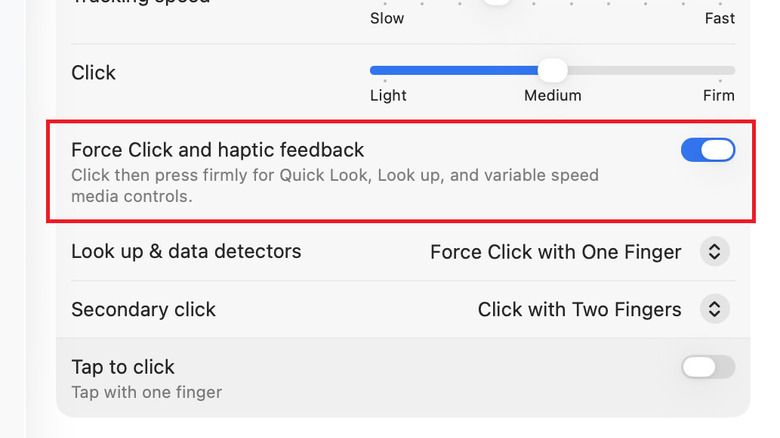
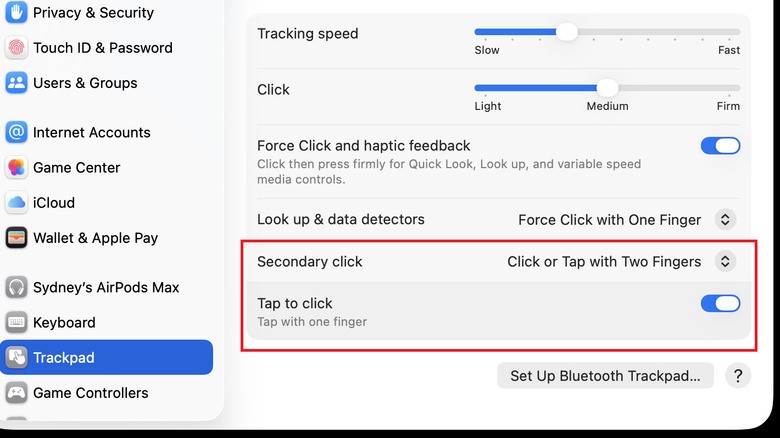
To ensure this is active, navigate to System Settings > Trackpad > Point & Click. Here, you can also adjust the click pressure from Light to Firm. I personally prefer the Light setting as it requires less physical effort for Force Click Mac actions, though some users find the Firm setting better for preventing accidental triggers.
One of my favorite hidden mac trackpad hacks for workflow is using Force Click for Quick Look. Instead of selecting a file and hitting the Space bar, simply apply a bit more pressure. This is particularly useful when scanning a folder of hundreds of PDFs or images. Similarly, using force click for quick lookups mac allows you to highlight a word in Safari and instantly see its definition or a Wikipedia summary.
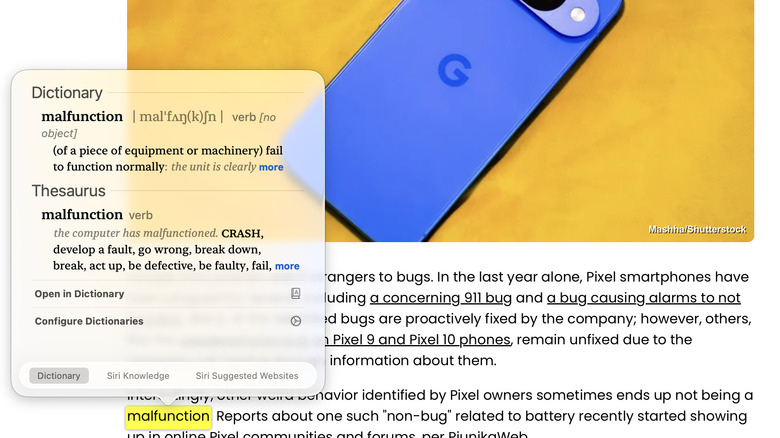
The efficiency here is found in the macos trackpad tap to click vs force click distinction. While tap to click is great for basic navigation, Force Click adds a vertical dimension to your input, letting you "peek" into content without the commitment of opening a new window or tab.
2. Advanced Navigation with Mission Control Gestures
If you are a professional, you likely have twenty windows open across five different apps. This is where Mission Control gestures become the backbone of your UI navigation. By default, a three-finger or four-finger upward swipe reveals every open window on your system.
Mission Control is more than just a task switcher; it is how you manage Desktop Spaces. By swiping up, you can see your various desktops at the top of the screen. This allows you to group your work: one space for email and Slack, one for your primary creative app, and another for research. To move between these, you don't need to click anything; just use a four-finger horizontal swipe. This swipe between full screen apps mac gesture is the fastest way to maintain focus without losing your place.
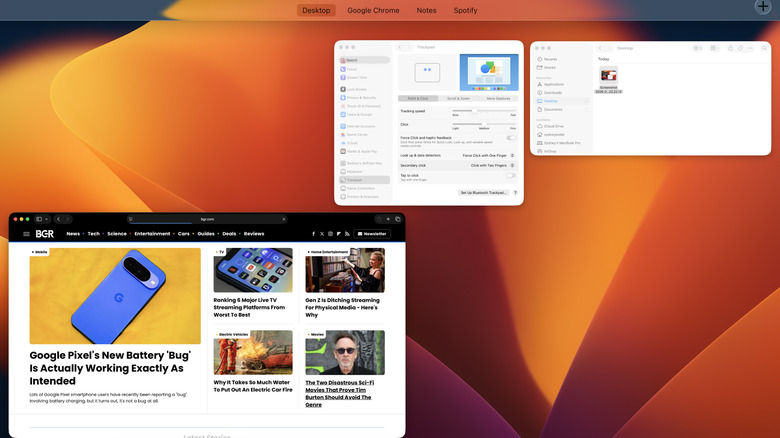
Another vital tool is App Exposé. If you have four different Word documents or three Chrome windows open, a three-finger downward swipe will isolate only the windows of the application currently in focus. This is a game-changer for Multitasking efficiency when you are trying to find one specific reference document among many. You can enable or tweak these in System Settings > Trackpad > More Gestures.
These MacBook trackpad gestures for mission control are designed to keep your hands on the trackpad and off the keyboard. While keyboard shortcuts like Command-Tab are great, the spatial awareness provided by a swipe feels more natural and requires less cognitive load when you are in "the zone."
3. The Pro Secret: Three-Finger Drag for Ergonomics
Ask any long-time Mac power user about their favorite setting, and they will likely point you toward the three-finger drag. Paradoxically, this isn't found in the standard Trackpad menu. It is hidden within Accessibility options because it fundamentally changes how you interact with the OS.
Standard dragging requires you to click and hold the trackpad while moving your finger. Over an eight-hour workday, this constant physical pressure can lead to significant finger and wrist strain. The three-finger drag removes the need to "click." You simply place three fingers on the trackpad and move them; the window or file follows.
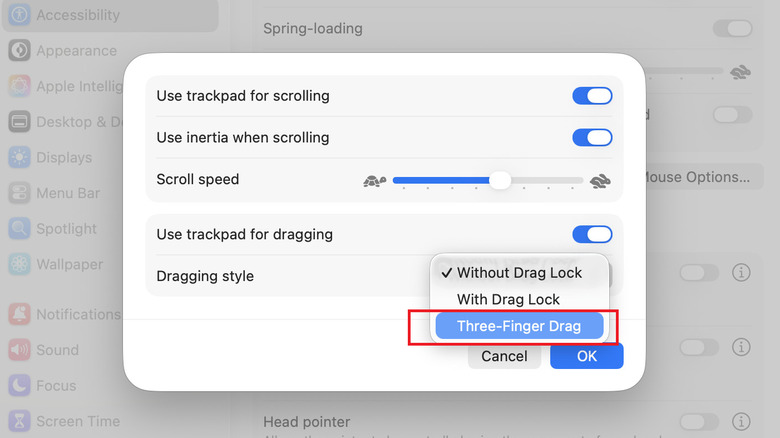
To enable the three-finger drag gesture on a MacBook, navigate to System Settings, select Accessibility, and then choose Pointer Control. Click on Trackpad Options, toggle the "Use trackpad for dragging" setting, and select "Three-Finger Drag" from the dropdown menu. This feature allows you to move windows and UI elements without applying physical pressure to the trackpad, improving both ergonomics and ease of use for long-term workflows.
This is arguably one of the most important macOS trackpad settings because it relies on the MacBook's superior Palm rejection. Even if your thumb grazes the edge of the pad, the system is smart enough to recognize the intentional three-finger movement. Learning how to enable three-finger drag macbook is the single best favor you can do for your carpal tunnel.
4. macOS Sequoia Window Tiling and Gesture Integration
With the release of macOS Sequoia, Apple has finally brought native window tiling to the platform, and the integration with MacBook trackpad gestures is seamless. For years, Mac users relied on third-party apps like Magnet or Rectangle to snap windows to the sides of the screen. Now, it is built directly into the system.
When you drag a window toward the edge of the screen using your newly enabled three-finger drag, you will see a faint gray frame appear. Letting go will "snap" the window into a 50/50 split or a quadrant. However, the trackpad-specific hack here involves the green "Zoom" button. If you hover over the green button with your cursor, a menu appears. Using the trackpad to select a layout, you can instantly tile your windows into complex configurations.
This update reflects the ongoing commitment to Multitasking efficiency. By combining native tiling with Mission Control, you can organize a complex workspace in seconds. It bridges the gap between the fluid navigation of macOS and the structured window management found in Windows 11. Adjusting your macOS trackpad settings to include these tiling features ensures your hardware remains relevant as we move further into the decade.
5. Beyond Native: The Power User Gesture Stack
For those who want to push their MacBook trackpad gestures even further, the native settings are just the starting point. I often recommend third-party utilities to my fellow PC builders who are migrating to Mac and miss the granular control of custom hardware.
Tools like BetterTouchTool allow you to create entirely new gestures. For example, you could set a "four-finger tap" to open your favorite browser or a "tip-tap" (keeping one finger down while tapping with another) to refresh a page. Another excellent tool is Swish, which focuses specifically on window management through gestures. Swiping down on a window title bar to minimize it, or swiping up to full-screen it, feels incredibly intuitive.
When you integrate these custom gestures with a productivity launcher like Raycast, you create a keyboard-trackpad hybrid workflow that is nearly impossible to beat. You are no longer just using a computer; you are conducting an orchestra of data.
6. Gesture Cheat Sheet for 2026
To help you internalize these hacks, I have compiled a summary of the most effective gestures. It is worth taking 24 hours to force yourself to use these instead of clicking through menus.
| Gesture | Action | Productivity Benefit |
|---|---|---|
| Three-Finger Up | Mission Control | Instant overview of all active projects. |
| Three-Finger Down | App Exposé | Quickly find one specific document in a stack. |
| Four-Finger Side Swipe | Switch Desktops | Separate work "modes" (e.g., Creative vs. Admin). |
| Force Click (on word) | Look Up | Instant research without leaving the app. |
| Force Click (on link) | Safari Link Preview | Peek at a website without opening a new tab. |
| Three-Finger Drag | Move Windows | Significant reduction in finger and wrist strain. |
| Two-Finger Pinch | Zoom / Launchpad | Fast scaling of images or app selection. |
| Two-Finger Side Swipe | Browser Back/Forward | Navigate the web with minimal hand movement. |
FAQ
How do I use trackpad gestures on a MacBook?
Most gestures are enabled by default and involve using two, three, or four fingers to swipe, pinch, or tap. You can view demonstrations of each gesture by navigating to System Settings and selecting the Trackpad menu. Each setting includes a small video clip showing exactly how to perform the movement.
What are the most common MacBook trackpad gestures?
The most common gestures include a two-finger scroll to move through documents, a two-finger pinch to zoom in or out of photos, and a two-finger swipe from the right edge to open the Notification Center. For navigation, the three-finger swipe for Mission Control and the four-finger swipe to switch between full-screen apps are standard for most workflows.
How can I customize gestures on my Mac?
You can customize the number of fingers required for specific actions in the Trackpad section of System Settings. For example, you can choose whether Mission Control is triggered by a three-finger or four-finger swipe. For more advanced customization, third-party apps like BetterTouchTool allow you to map almost any trackpad movement to a system command or keyboard shortcut.
What is Force Click and how do I use it?
Force Click is a feature on modern MacBooks that uses the Taptic Engine to sense pressure. To use it, simply click on an item and then press down harder until you feel a second "click" sensation. This is used for functions like Quick Look, Look Up (definitions), and Data Detectors (like adding a date directly to your calendar).
How do I switch between full-screen apps on a Mac?
The fastest way to switch between full-screen applications or different Desktop Spaces is to perform a four-finger horizontal swipe across the trackpad. This allows you to glide between active environments instantly, which is essential for maintaining a clean and organized digital workspace.
The beauty of the MacBook lies in the fact that 89% of Mac users believe that macOS applications are easier to use than software on other platforms. This ease of use isn't accidental; it is the result of a hardware and software synergy that prioritizes the human hand. By moving beyond the basic click and embracing the multi-touch layer of macOS, you aren't just using a laptop—you're mastering a professional tool. I challenge you to enable the three-finger drag today. Your wrists, and your clock-out time, will thank you.